YADBS - Stage 5'
ok lets call this stage 5'. only major change being the switch to rearsets. and as i hinted earlier, the whole issue was an absolute nightmare. major reasons being:
o Bad quality of metal used in the rearsets
o Terrible quality that our local welders dish out
ok the above points make sense if you consider that installing rearsets involve some amount of welding and the whole thing is supposed to take quite some abuse.
the whole process is not at all a simple affair, especiall if you happen to do it yourself. of course the assumption is that you dont own a welding shop, lathe, machine shop etc. the whole process can be summed as a nightmare, at best.
whats the big deal, you ask. ok lets first talk about the left side of things. you first need mounting points for the rearset. so we take it to a welding shop and weld mounting plates (on both sides) for the rearsets. right now at this point itself, the advantage of aluminium rearsets stand neutralized. because we notice that the welding process has deposited so much metal in the form of joints and plates and that easily adds to the overall weight.
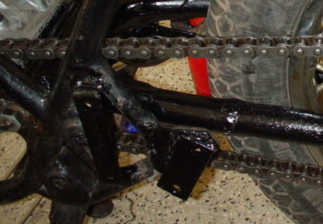
in the above pic notice the vertical bar welded on. this will take two bolts which will hold the rearset fast. same thing applies on the right side as well.
so concentrating onto the leftside, we screw the rearset onto the mounting points and tighten. now the rearset is in place, and the next step is to connect the aluminium gear lever on the rearset to the gearshaft. so we need a gear shifter to sit on the shaft, to which we attach one end of a shifter linkage the other end of which will connect to the lever on the rearset. we spend a couple of days brainstorming on the same and finally decide on the CBZ gear shifter which we buy from the showroom. sincere thanks to cutcrank for his advice on this.
so the CBZ shifter is tightened onto the shaft and we weld it on for good measure. of course, the reason is simple - we couldnt get hold of an original shaft. so weld it if you dont want to depend on the threads.
so we have the shifter on the shaft and the lever on the rearset, and they are separated by a good 25cm or so. so we need a linkage rod which will connect them. again cutcrank comes to the rescue. idea - get the CBZ linkage rod, cut it in center and insert a piece of needed length. so thats what we do.
now the issue here is - the length of the linkage has to be very precise. too short and the gear goes more towards the horizontal. too long and the lever dips down too much. somewhere in between you need to find the correct length and it took us at least 5 runs to the welding shop before we arrived at the correct length. to top it, the welding points broke off couple of times and so more runs to the shop.
so finally we get a strong enough linkage of perfect length and we have the lever and shifter joined and so the gear shifting setup is functional.
and now onto the right side of things.
ok but just before that take a look at this crude drawing which highlights some of the paramters of a shifter setup.
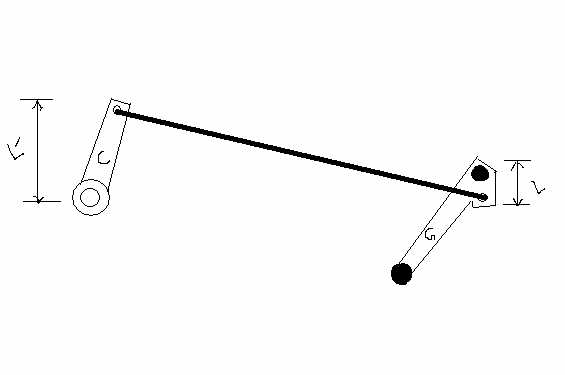
there are two dimensions to be noticed here - L and L'. decrease L' and increase L and you reduce the overall lever action needed. but at a cost - you need more force on the lever. go the other way and you gain leverage but at the expense of more lever movement. at this point we were not sure which way to go. but if we had kept our eyes open at the drag, we would have got enough clues. more on this later.
so onto the right side. inital steps are the same for the right side and we first bolt the rearset onto the mounting plates. a similar lever comes on the right side and its aluminium too. now one question loomed hard. how do we connect this brake lever to the rear drum? the problem is that they exist in different planes. what we did was this.

|
as it is obvious now, not a good idea at all. the lever on the drum has been modified to take a horizontal leap in between, to connect the two planes. very bad idea, the reason being a lot of flex in the lever. but for now we are happy with this and it does seem to work. |
but anyway at some point of time we reached a level of satisfaction and we considered our rearset project done and a success. ignorance is bliss man.
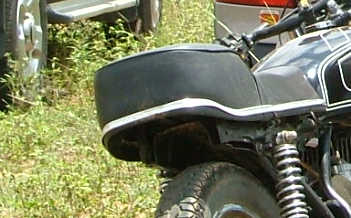
so we divert attention elsewhere and decide to switch from the stock seat. i get a seat made by my mechanic, a fibre base one, and get it installed at the welder. also ensure that sits properely and gets bolted
|
on fast. as you can see its not a proper drag seat, but more of a custom stock seat. but it was light and it fit well. but the bum stopper is not the way it looks, its just a shape out of foam and there is no plate out there to stop the back from sliding. no problem we think. but bum |
so the stage 5' bike is different from stage 4 in the following ways
o modded gearbox
o better, lighter, seat
o rearsets installed
o all down gear shift pattern
so far so good but now we notice that we are still stuck with the stock carbs and so we start planning for something bigger and better.